Resident Evil Inspired Template
Summary
This template was created by me using Unreal Engine’s Third Person character that was used for my other portfolio piece, The Mansion.
Breakdown
- 5 weeks half time (4 h/day)
- Unreal Engine 5.6
- Template made by me.
Goals
My goal with this template was to create a fixed camera system, interact system, tank controls and doors that communicate with an inventory system and level sequencers.
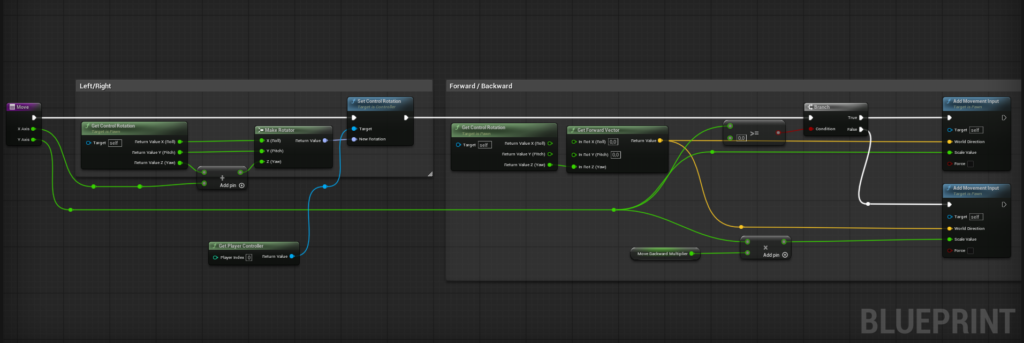
Player controller
The original Resident Evil games limits the players movement with tank controls, therefore I made a duplicate of Unreal Engine’s default character and changed how the player controller works so it mimics the classic Resident Evil left and right input to rotating, disabled jump and made so you cannot fall off ledges.
Interactables
I created my interactable system using Function Libraries so that I could use it in other blueprints without needing to repeat a bunch of code.
I can check “is Item” to true or false if I want the interactable to be purely environmental or if it’s an item.
This is a super modular way to work with different types of interactables. In case there is need to create a new item it can easily be done so with a new item in the Data Table.
It’s a very easy and modular system. If I want I can create new items in my Data Table pretty quickly, since I set up everything in my Structure. A late addition to my level was the fire extinguisher.
Here is a showcase on how easy it is to set-up a new item.
Doors
The Door Problem
Since doors are such a huge part of this template I needed to address The Door Problem. I decided to have a handful of doors that you can interact with. Whether it’s a door that requires a key or not. Some doors cannot be opened at all, so they’re missing a doorknob and they get an interactable message telling the player that this door cannot be opened. Once you interact with a door you can open, a cutscene plays like the original Resident Evil games, having the door problem resolved.
I set up the door system with Data-Tables and Structures and once this was done and all of my logic in the door blueprints were done it was pretty simple to work with.
I have two different doors, one of them is a bit more complicated since it communicates with a inventory system which is based on CodeThings tutorial. I will mainly cover how the door works and not the inventory system in itself.

(Click to view blueprint)
The door communicates with the inventory and checks if the required key/item is in the inventory. If it is, it unlocks the door. If it isn’t, it will give a message telling the player they don’t have the required item.
I needed a “One-way door” as well. The reason why I built a new door was simply because I did not want to break my doors that require keys, instead I used the base of the door script that could only be opened with keys.
The door blueprints also communicates with level sequencers and plays a door cutscene when the player interacts with it. It takes the length of the cutscene so I don’t have to manually write in the length.

Camera
The goal with this template was to replicate the original Resident Evil camera. So I looked at the original game to see how the camera works and it’s clear that they made use of trigger boxes that once entered changed the camera, this made it clear for me on how to build the camera system.
How I set up the scene was by placing out the camera and then moving the trigger box and camera to get the angle I wanted. It became very apparent to me that it’s very important to be precise and leave some space so that the camera doesn’t lose track of the player since this was an issue when I first set up the camera.
I also noticed that the last camera I placed out on the scene or moved automatically became the “starting camera” and I felt this was super annoying. My solution was to make a boolean that checks if a camera is a starting camera or not. This made me save a lot of time while testing out different places in the level.
Level Sequencers & Scripted Events
I made use of Unreal Engines level sequencers a lot while building the level and this as been a super powerful tool for me to change things in the level in a super fast and efficient way.
I used a lot of sequencers to spawn trigger boxes that will trigger my scripted events. So this blueprint is essentially just playing a sequencer once to create a scripted event and add some cool encounters in the level.
Reflections
I think this has been a great and fun experience and I have learned a lot by working with this template and I am very satisfied with how it turned out. It helped me create a level for my portfolio which was the goal (The Mansion).
This template has given me good insight on how to work with Function Libraries, Data-Tables and Structures, something that I didn’t make use of as much before this template. It really helped me understand how powerful these tools are to create a modular template that is easy to work with.
It’s also been pretty fun to work with a template that I have built since I can add things that I know will benefit in my level design.
If I had more time to further improve it I would add actual enemies, combat and healing. This would probably create a better backtracking experience where you could have “dead” enemies laying on the floor and when you backtrack they get up and start attacking you. This would definitely be something that could be improved on if I were to build further upon the template.
Thanks for reading!
Ediz